How to Add Alt Text to Your Documents on Google Docs and Microsoft Word

Isn't it intriguing that most of us come across the term "Alt text" and hardly know what it’s used for? Or maybe you do, but you never really bother to use it because you think, "What's the essence?" Well, let’s clear the air on that.
For those who are unfamiliar with it, alternative text—commonly referred to as alt text—is a brief description that provides information about an image. It serves a crucial purpose and that is to help individuals who are visually impaired or rely on screen readers understand what’s displayed in an image. But that's not all. Even if you think you don’t need it, alt text plays an important role beyond granting accessibility.
Think about it this way: If an image doesn’t load due to a slow internet connection, alt text appears in its place, ensuring the message still gets across. Additionally, search engines rely on alt text to understand image content, meaning it can improve your website's SEO ranking. So, even if accessibility isn’t your primary concern, boosting your content’s visibility on search engines is always a plus.
Now that you know why alt text is important, let’s dive into how you can add it to your documents.
4 Steps to Add Alt Text on Google Docs
- If you're working in Google Docs, adding alt text is pretty simple. Here’s what you need to do:
Step 1. Head over to the document you want to add alt text.
Step 2. Right-click the image and select "Alt text" from the dropdown menu.
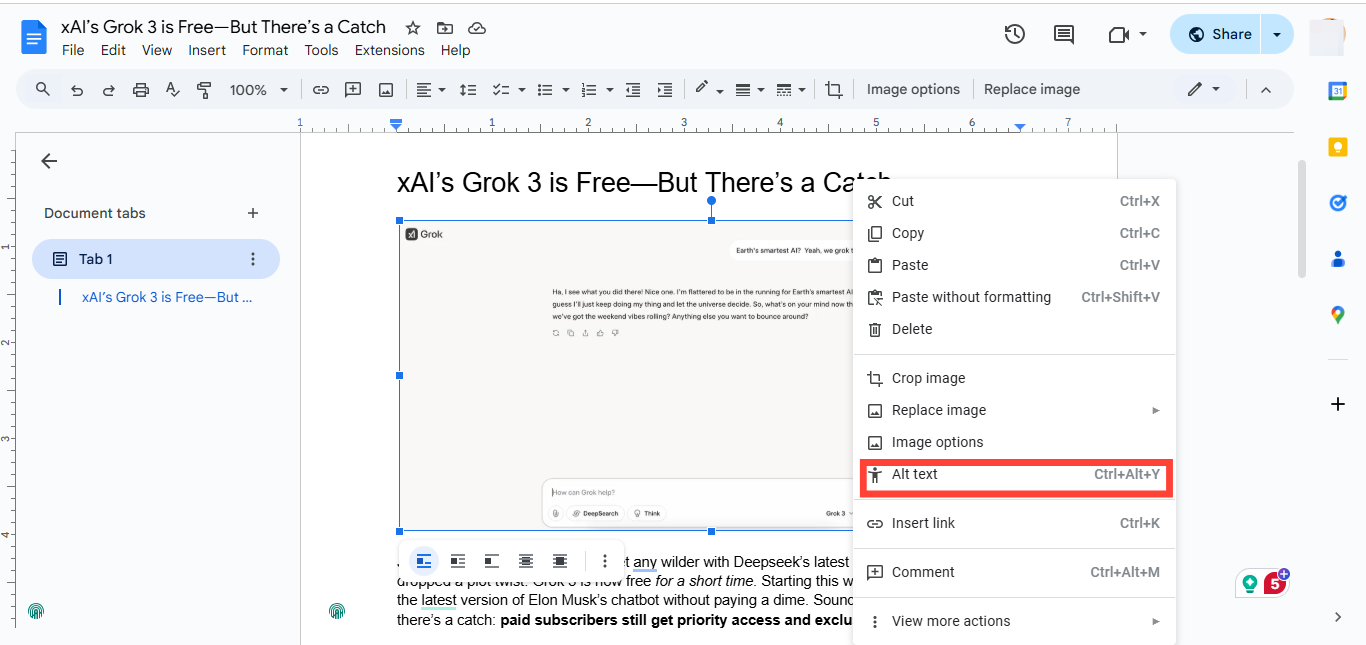
Step 3. A dialog box will appear for "Description". Write a description that clearly explains the content and purpose of the image.
Step 4. You can also add a title to your image. To do this, click the "Advanced option" to type the title, and you’re done. Automatically your description and title are saved.
5 Steps to Add Alt Text on Microsoft Word
- For those using Microsoft Word, the process is just as easy:
Step 1. Head over to the document you want to add alt text.
Step 2. Click on the image you want to describe.
Step 3. Select "Alt Text" from the right corner of the screen.
Step 4. A sidebar will appear where you can enter a description of the image. Word normally generates an automatic description for most images, but it's always best to customize it for accuracy.
Step 5. Click the "Close" icon, and that’s it your image now has an Alt text.
Conclusion
With these simple steps, you’re not just making your documents more inclusive—you’re also improving their usability and reach. So, the next time you add an image, don’t just leave it blank. Take a moment to write meaningful alt text. You never know who it might help.
Image credit: David Adubiina/Techloy.com