How to Sign Documents in Microsoft Teams Using Zoho Sign

The user population of Microsoft Teams is surging, as numerous companies worldwide are adopting it as their preferred platform for team collaboration and idea sharing.
Microsoft deserves credit for regularly introducing new features to the application. In addition to enhancing video calling capabilities, Microsoft has also integrated the functionality of signing documents within the Teams app. This feature proves to be highly convenient for swiftly signing and sharing documents.
The benefit of signing documents using Microsoft Teams is that you don't need any additional software installed on your PC or Mac. The Teams app, along with its integrated features and apps, allows you to conveniently sign documents without the need for extra software.
In this article, we would be going over how to sign documents in Microsoft Teams using Zoho Sign. To learn how to use SignEasy to sign documents in Microsoft Teams, see this article.
- To begin, launch Microsoft Teams and locate the three-dot menu in the sidebar.
- Select the Get More Apps option from the menu to access the dedicated app store for Microsoft Teams.
- In the upper left corner, you'll find a search bar. Type Zoho Sign in the search bar.

4. Once the search results appear, select the Zoho Sign app and click on Add to install it within Microsoft Team

5. Once the installation is complete, access the Zoho Sign app from the sidebar and log in using your Zoho credentials. If you're using the app for the first time, sign up for the service by following the provided instructions.
6. To add documents in Zoho Sign, either upload them manually by clicking on the red + button or simply click Sign yourself.

Or simply use the Drag-and-drop feature.

7. Once you've uploaded your file, click Continue.

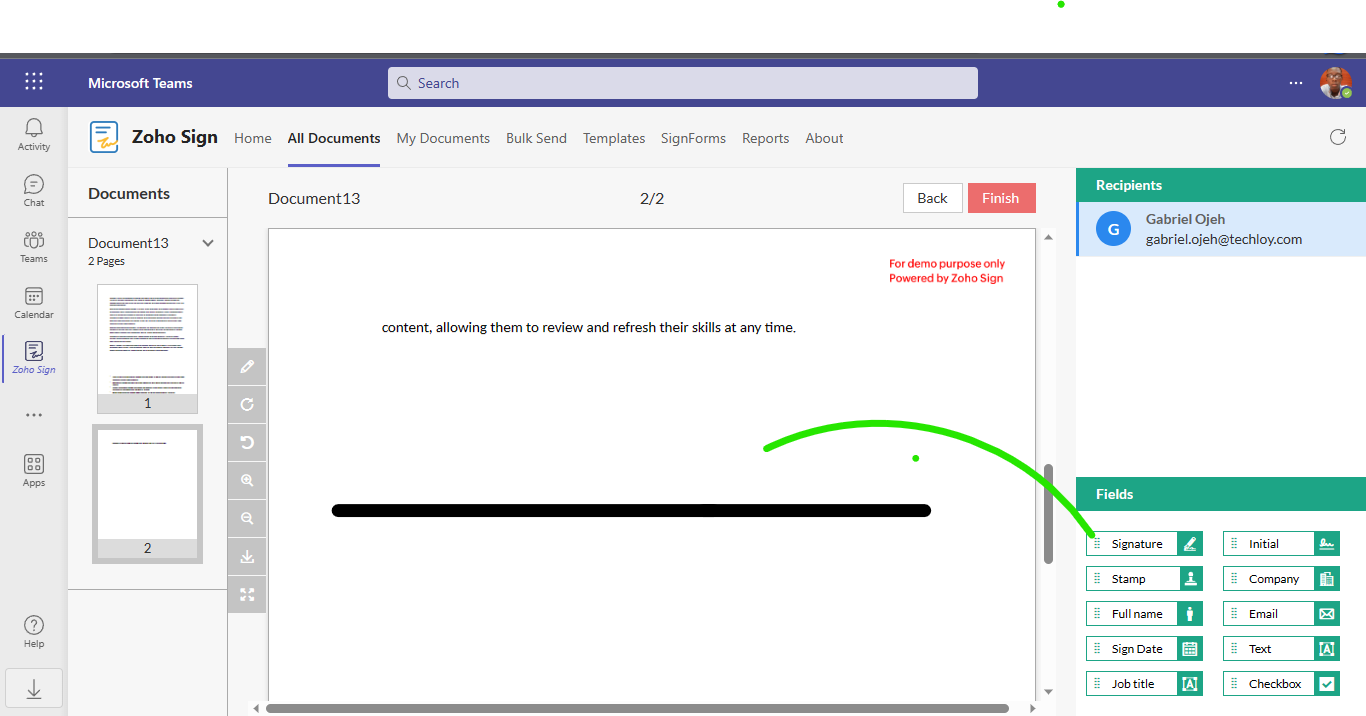
8. Next, Zoho will open the document within Microsoft Teams, offering you a range of editing options. These options include adding your signature, initials, company details, email, text, job title, and date. You can easily utilize these editing features by using the drag-and-drop functionality available in the sidebar.
Since our intention is to sign a document, we will focus on utilizing the signature feature.

9. After dragging out the signature feature, simply click on it to input the desired text that you want to serve as your signature.

10. Upon clicking the signature bar, you will be presented with various sample signatures as samples (please note that these samples cannot be used as actual signatures). To proceed, simply type the word or text that you want to use as your signature in the designated area.

11. Next, select the font for your signature

12. You can resize the signature to fit in or move it to the specific spot you want.

13. Once done, Click on finish and a pop-up would appear asking you to input the email of the recipient. If you are required to send the signed document via email, you can then input the recipient email, if not, click close.

14. Next, the signed document would be saved automatically. You will have the opportunity to view the saved document. Any document you save would appear here.

Conclusion
When you find yourself in a situation where you need to sign and send documents promptly, Microsoft Teams provides a convenient solution. The introduction of a dedicated app store within Microsoft Teams is a valuable addition to this widely used software.
The available add-ons extend beyond productivity tools, encompassing project management, and education, as well as apps tailored for IT departments and developers. Once you have set up Microsoft Teams, I recommend exploring the app store and downloading the relevant apps that suit your needs.
Image Credit: Gabriel Ojeh / Techloy.com


